Showing posts with label Toddler Crafts. Show all posts

Tuesday, June 9, 2015

Toddler Art, 2015 Edition


This is one of my favorite toddler programs and it is always on my schedule every summer at the beginning of summer reading.   You can check out past programs here, here, or here.  I love it because each creation turns out different.  Plus, most of my parents end up going shopping right after the program for their own art supplies to make cool creations at home.  After all, every house needs a bottle of glitter glue!

Our shape this year is a fancy star shape to fit our Every Hero Has a Story summer reading program theme.  To make the shape, I printed the star shape using Microsoft Publisher on white cardstock.  As kids came into the room, I handed them two star shapes and explained that one would go home with them and one would stay with me.  Each of our stations had a different art supply.

This year's stations include: 
As kids finished their projects, I passed out paper plates so they could get their creations home.  As my stars dried, I added them to our bulletin board in our activity room.

Friday, February 6, 2015

Toddler Valentine's Crafts

The neat thing about working with toddlers is that you can reuse awesome crafts and programs every 2-3 years for a whole new crowd.  2 of the crafts from this program have been posted here before and 1 is new.  My toddler craft programs are limited to 20 2 and 3 year olds.  I run it as a station program where there is a different craft at each station.  Almost everything is precut and I try to focus on only one skill per station (ex. gluing).

Craft #1-Envelope totes
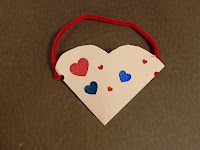
This craft appeared in my first post ever.  To make your own, seal an envelope.  One of the corners will form your bottom point.  I cut the rounded heart bumps (the top) above it.  We decorated our hearts with stickers and attached a pipe cleaner through two prepunched holes to make a handle.


Craft #2-Clifford
This craft appeared here when we celebrated Clifford's 50th birthday in 2013. From the pattern, I precut all of the shapes so the kiddos just had to assemble their Cliffords.  Some kids made their Cliffords upside down from my example, but that is okay.  Then Clifford just had a different look.


Craft #3-Heart collage
To make our third craft, I drew a heart shape in Microsoft Publisher and printed it on white cardstock.  I pretore red, pink, and purple construction paper and the kids added these pieces onto their heart.


Tuesday, December 9, 2014

Toddler Holiday Crafts

This morning we ran our Toddler Crafts program for ages 2-4.  At my library this type of program is station-based so kids and their adults work on the projects together.  I always have a sample on the table for them to follow.  When choosing projects for this age group, I tend to focus on one skill, whether it be coloring, gluing, or something else.  To tie this type of program back into early literacy, most of these projects work on fine motor coordination, which strengthens hand muscles so kids can begin to write.  Here are today's projects.

Reindeer Food
For this station, I left all of the ingredients separate so kids could add what they wanted to for their reindeer food.  We have a lot of allergies (and parents who won't play with glitter).  While I do my best to make sure everything is peanut-free, the parents really do know best.  To make your own reindeer food, you will need:
  • 1 large canister of oats (Quaker is peanut-free)
  • Glitter
  • Sprinkles
  • Label with directions


Wreaths
To make your own holiday wreaths, you will need paper plates with the centers cut out, yarn to hang your wreath, and wrapping paper strips in a variety of colors.  I precut the strips and the paper plates so kids just had to glue the strips onto their plates.


Snow Globes
For this station, I precut the snowglobe pieces and had the kids glue their snowglobes together.  I also put out blue and purple glitter glue, snowmen and penguin mini stickers, and crayons for them to decorate their globes.  Glitter glue, as always, was a huge hit.  My station was set up like this:


My final project looked like this:


Tuesday, July 1, 2014

Toddler Crafts

This morning we ran our Toddler Crafts program for ages 2-4.  At my library this type of program is station-based so kids and their adults work on the projects together.  I always have a sample on the table for them to follow.  When choosing projects for this age group, I tend to focus on one skill, whether it be coloring, gluing, or something else.  To tie this type of program back into early literacy, most of these projects work on fine motor coordination, which strengthens hand muscles so kids can begin to write.  Here are today's projects.


Paper Plate Fish
If you have never made your own paper plate fish before, they are super easy.  Cut a triangle out of a paper plate and staple it to the plate to form the tail (see above).  I cut a variety of construction paper squares and kids glued them on.  I had some leftover sticker eyes from another project and the kids had great fun adding the eyes to their fish (one kid ended up with six eyes on their fish!).


Envelope Puppets
Envelope puppets are one of my favorite projects because they are low-cost, easy, and come out with a great product.  To make your own, seal an envelope and cut off about 3 1/2 inches at the end.  If you use letter-sized envelopes you will be able to cut them in half.  Today I made a variety of animal die cuts on our AccuCut die cut machine and put them out for kids to glue to their envelope.  They could then decorate their animal with crayons.


Bead Necklaces
I bought three supplies to make these necklaces:
When looking for beads for this age group, look for larger-sized beads and ones with large holes.  Tipped lacing yarn is great because it is easier to string through the holes.  To set up this station, I put a handful of each type of bead in a cup along with 1 piece of yarn.  This made it easier to pass out.

Toddler Art

This is one of my favorite programs that we run every summer.  It is one that I pull out in some form every June (you can see past ones here and here).  What I like best about it is that every project turns out different-there is no one right way to do it.  Plus, I am exposing kids (and their parents) to a wide range of art supplies.  Many parents watch what their kids like and then ask me afterwards where they can purchase something similar.

Since this year's summer reading theme is Fizz Boom Read, I cut stars out of 8 1/2 x 11 90 lb. cardstock.  To make a pattern, I went into Publisher, used the star shape and made it as big as possible and so it would still fit on the paper.  As kids came into the room, I handed them two stars.  Also, I explained that one star would go home with them and one would stay to decorate the library.  I set up stations in our Activity Room and each station had a different art supply.

This Year's Stations Include:
  • Glitter Glue from Discount School Supply-I really like these bottles because the young hands are able to easily squeeze them.  Please note-you can never have too much glitter glue.
  • Watercolor Paints from Discount School Supply
  • Chubbie Markers from Discount School Supply-These are awesome!  Kids love to make dots and color with them.  The finished product looks similar to something painted.  They aren't as messy for little hands as regular markers. 
  • Star Stampers from Oriental Trading
  • Star Stickers from Oriental Trading 
  • Crayons

One of my staff members had made a bulletin board for Fizz Boom Read in the Activity Room.  We added our finished stars to the board.


What's really fun about this is that kids are always taking their parents back there to find their star.  It's like our own art gallery!

Tuesday, December 18, 2012

Handprint Christmas Trees

My nieces (and now 1 nephew) and I have always tried to come up with a Christmas gift that they all can work on that we can pass out to the aunts, uncles, and grandparents on Christmas Eve.  This year we decided to make handprint Christmas trees.

Supplies Needed
  • We used an 11x17 canvas from Michaels because they sold them in a 7-pack and the size was big enough for everyone's hands.
  • Paint-green, brown, yellow, red, purple, blue, orange
  • Paper plates
  • Baby wipes
  • Ultra fine point Sharpie

We started this project on a day when all of the kids were at Nana's house.  Green paint was spread on a paper plate and each kid dipped their hand in paint and added it to the tree.  Our family is kind of large so we needed to paint five canvases.  Then we set them aside to dry.  This year we learned that babies don't always like to dip their hands into paint so it helps if you have a paint brush handy so you can paint their hand as you spread out their fingers.
 
On a different day, one of my nieces and I sat down and finished the pictures.  I added stars to the top of the trees and trunks to the bottom.


We added a garland to each tree using our fingerprints.

 
My niece had a great time adding ornaments in different colors.  You will want baby wipes handy as they are great for wiping fingers in between the colors.
 
 
I am kind of impressed by how they turned out!  We are going to take an Ultra Fine Point Sharpie and label each hand and add "2012" to the side of the canvas.  This weekend the girls will wrap the paintings and decide who gets what and we will pass them out for Christmas.

Shape Clifford Craft

We are preparing to celebrate Clifford's 50th birthday this February with a big birthday party.  While it is slow over the holidays, I came up with this pattern.  I like it because it uses shapes to create Clifford's face.


Supplies Needed:
  • 2 pieces of red paper
  • 1 piece of black paper
  • 1 piece of pink paper
  • 1 piece of white paper
  • 1 glue stick
  • Shape Clifford pattern
When making them with a group of toddlers or preschoolers, I precut all of the pieces so the kids just have to glue.

Thursday, December 13, 2012

Chocolate Handprint Reindeer

One of our biggest activities of the year is making chocolate handprint reindeer ornaments in December. 
 

Supplies Needed:
  • White cardstock circles for handprints.  We have a circle cutter that makes 6 inch circles that works great.
  • With a group this size, we use 3 large boxes of chocate pudding.  Make it according to the directions on the box (so you will need a gallon of milk too).
  • Disposable foil trays to hold the chocolate pudding
  • 3 rolls of ribbon for hanging
  • Sticker eyes
  • Red circle stickers (We use Avery #5466)
  • 2 rolls of paper towels
  • 1 package of baby wipes
  • A couple of brown crayons
  • Access to a laminator
Registration:
With 2 librarians, we run through 80-90 kids comfortably in three hours. I would encourage registration. We stagger the registration times by age every thirty minutes. For example, 9 & 9:30 are 0-24 months, 10 & 10:30 are 2-3 year olds, and 11 & 11:30 are 3-6 year olds. By doing it this way, you can keep the group smaller with the babies, who will need more help (we run 10 in a time slot) and increase the attendance for the older kids (15 3 year olds). Since we do registration, we have an Avery address label already printed up with each child's name and the date that we put on the back of each circle.

Also, if you advertise the program, make sure you use "chocolate pudding" in the program description.  Some children with food allergies will not be able to do the project (or you can pull out brown crayons for them to make their "hand").

How the Program Works:
The kids come in and make their handprints using chocolate pudding.  We let each child make 1 print.  (Some of the moms will ask to redo them because they don't always look like hands, but once you add eyes and a nose, it will look great.)  We lay all of the circles out to dry.  Some will be done in an hour, but many will take 12-24 hours.

On the staff side, we add sticker eyes and a nose when the pudding is dry.  The circles are run through laminator, a hole is punched in the top, and a ribbon is strung through to create an ornament.  When we advertise the event, we also advertise a pick-up day that is 4 days later so we can get our part done.

Why we do this:
First, this is a lot of fun.  As kids make their handprints, you can also suggest to parents that chocolate pudding is a great way to fingerpaint at home (trust me, they love new ideas).  Secondly, as kids pull out their ornament year after year, they will remember that they made it at the library.  It is a great plug for us!

Miscellaneous Stuff:
  • You will want a couple of brown crayons for kids with food allergies or those who don't want to get dirty.  We were really surprised last year when kids did not want to put their hands in chocolate pudding (about 1/10 of the kids).
  • When trying to get the kids to put their hand in chocolate pudding, we told them to make a "high-five" in the pudding and then on the circle.  They understood this much better than their mom telling them to spread out their fingers.
  • The gloppier the chocolate pudding on the handprint, the longer it will take to dry.  If you are in a hurry, you can either blot the glops with paper towel or use a plastic spoon to scrape some off before it starts to dry.
  • If you use a hot laminator and there are glops, the pudding can melt and spread.

For some additional fun, here are some of the handprints that my nieces have made over the years!  After awhile, you do run out of room on your Christmas tree.


Tuesday, December 11, 2012

Toddler Crafts-Holiday Crafts

This holiday season we ran a toddler crafts program for 26 2 & 3 year olds.  The important things to remember when running a toddler craft program are to focus on one skill per craft and to have everything set up ahead of time.  To see how we set up our toddler craft program, check here for a previous post.

Craft 1: Christmas Tree Ornaments
I have recently found that paint samples are a great craft supply, especially when working with young children.  For this craft, we used Behr green paint samples (the one with Jungle Green at the bottom).  If you ask, your local Home Depot paint department will help you out, especially if you are in the same area as their store.  Cut your sample into a triangle shape and punch a hole at the top.  We prestrung all of our samples so all the kids had to do was add stickers.  Oriental Trading sold us Christmas mini stickers, which fit perfectly on our trees to decorate them.  They were also easy to peel for little hands.  The parents loved this craft and many mentioned that they would also be visiting Home Depot for their own green paint samples!


Craft 2: Paper Bag Snowman
As with most of our crafts, we had all of the snowman's parts precut and inside of the white paper bag.  A pattern is available here.  The kids' job was to glue the parts onto the white paper bag.  The results of this craft were surprisingly fun as the kids came up with their own ideas of what the snowman should look like.  Some flipped their bag over and made their snowman into a puppet.  One kid used the red hatband as the snowman's mouth and the extra black circles as buttons because their snowman needed a smile.


Tuesday, August 7, 2012

Toddler Crafts

I love to do Toddler Craft programs for 2-3 year olds.  Many of the people who attend really appreciate the program and I get a lot of "I didn't know that this is something that my child can do."  We register 25 kids for a Toddler Craft program, which allows me to circulate and assist all of the kids if need be.  To fit with the 2012 summer reading program theme Dream Big Read!, both of our crafts were star-themed.

Set-Up
If at all possible, have everything that they will need at each child's place.  It allows the parent to focus on working with the child, rather than searching the tables for more supplies.  We share our program area with our public meeting room, so depending on the previous day's set-up, I will either use the meeting room tables or do the crafts on the floor.  Either way, I will cover the area with butcher paper.  (As long as the paper isn't covered in anything wet or sticky, we roll it up when we are done and reuse it.)  All of the parts for our crafts are put in foam cups (also reusable!) so we can sort the parts ahead of time.

Today's set-up

Craft 1-Decorate a star wand
Every child received 1 star wand that was already put together.  To make the star wands, we cut star shapes with our AccuCut Star #2 die out of fun foam.  Using a glue dot, we attached 1 star shape to a craft stick.  Each child had a strip of star stickers and 4 foam star stickers in their cup that they could stick to their wand.

Star Wand

Craft 2-Star necklace
Every child received a string of yarn with tipped ends and 17 star-shaped beads in their foam cup.  The thing to watch with a beading project is that you don't give the kids too many beads.  Beading is work for this age group and you want them to be able to finish on their own.

Note-You have to know your group if you want to do beading with this age group, because beads can be choking hazards.

Star Necklace


Final Thoughts
The kids loved these crafts and all of them finished.  It was also easy to insert little educational ideas into conversation, such as "Wow, you are doing such a good job beading.  This is exercise for your hands so you will be able to write when you go to school."  While we all recognize it as fine-motor coordination, it helps if you explain what that actually is or why it is a good thing and how it relates to libraries.  For example, "Writing and reading go hand-in-hand."

Thursday, June 28, 2012

Toddler Art

Today in our Toddler Art program we made stars to decorate our program room for the summer.  We registered 25 2 and 3 year olds.  I like to set up the program so the kids get to try a lot of different mediums.  The actual program took no more than 1 hour, but it does take some time to set up and prepare.  You will also need a place for the creations to dry undisturbed.

Every kid who registered got two star shapes.  We were able to purchase packs of 24 white cardboard stars from Oriental Trading.  They decorated one star to take home and one star to give to me to hang up.  We put out 6 different stations and kids could spend as much or as little time as they wanted at each.  All of our stations are on the floor and we put down a lot of paint tarps and brown roll paper to help contain the mess.

Station 1
Station 1 was watercolor paints.  If you have the option, you will want 8-10 sets for this size group.  I always add extra brushes so some of the kids can share.  The kids will spend the most time here.

Station 2
Station 2 was glitter glue.  Discount School Supply sells a 6-pack of Rainbow Glitter Glue that the small hands can easily squeeze.  The glitter glue lasts a long time so I am able to put out extra old bottles so more than 6 kids can work at a time.

Station 3
Station 3 was jumbo crayons.  I like to have something familiar for those kids who don't like new or messy things.  They are also great for the kids to practice writing their names on their creations.  We put these on giant brown roll paper, which allows little siblings to feel like they are crafting too.

Station 4
I was surprised by how popular this station was.  We used Star Stampers from Oriental Trading.  There are 24 pieces in this set so everybody had a chance to use them.  Since the stamp pads are included in the stamper, they didn't make near the mess that stamps and stamp pads normally do.

Station 5
Almost all kids like stickers.  I found a variety of star-shaped stickers, some in foam and some in packs of stickers.  For the sticker packs, I cut the star stickers into strips so one kid wouldn't take the whole sheet and go crazy.  As it was the kids stickered their creations, then themselves.

Station 6
At station 6 we used dabber markers from Discount School Supply.  If you haven't used them before, they are a lot of fun to use.  They make great dots in a variety of colors.

Below are some of our finished products.


I like to create one too for an example.


I love to run programs like this for young kids as they have a lot of benefits other than the obvious cool decorations.  Kids get to use their imagination to design their creations.  The glue, paint, markers, and stamps all make the kids use their fine motor skills, which increases their preparedness to write.

Wednesday, April 25, 2012

Toddler Art-Caterpillar Mural

This is a relatively inexpensive program to put together as you can tailor it easily to your customers and the size of your program room.  As children come into the room, I give them each 2 paper plates.  One plate is for them to take home and the other is for me to hang on the wall.  I set up stations of various art supplies throughout the room.  At our location, it is easiest for us to work on the floor as we can just cover it with paint drop cloths or giant roll paper minimize the clean up.  We do only register 25 kids so everybody gets a chance at every station.  With the art supplies, I always try to find some different ones so they can try something new.  With our most recent program, these are the five stations that I used:

Station 1-We used the Easy-Grip Super Stamping Sticks from Discount School Supply (item #8WWSTICKS).  These are great for little hands as they are easier for them to hold, which means that they have more control over the stamper.  It helps if you only use one color stamp pad.  For this program, we pulled out 4 green washable stamp pads.

Station 2-Our next station was Colorations Glitter Glue from Discount School Supply (item #8WWGLITGLUE).  This set of glue contains 6 4 oz. bottles in a variety of colors.  Little hands are able to squeeze the glue without help.  (Note-don't expect to be able to reuse the bottles of glue.  Chances are that they will up every last drop.)

Station 3-Some kids don't like to get messy so we put out a station of chubby crayons.  We use a combo of the large crayons from Discount School Supply (#8WWCLR8) and the jumbo crayons from Lakeshore Learning (#VX275).  Crayons are also good because you can encourage children to sign their creations and pull in some of those early literacy skills.

Station 4-We used dabbers or dot art markers.  While kids will sometimes color with them, the real use is to make lots of colorful dots.  This was the first time that we used these and they were a definite hit.  Our dabbers came from Discount School Supply (#8WWDABDOT).

Station 5-You have to have a paint station.  There will always be 1 or 2 kids who spend the whole session just painting.  You will want plenty of watercolor paints and extra brushes (they don't mind sharing the paint, but they need their own brush).  We also put the cups of water in a plastic dishpan as they will get tipped over and played with.

As the plates dry, attach them to a free wall.  You may want to do a spot test to make sure your tape will eventually come off.  We use masking tape.  If you run out of room, make another face and start a 2nd or 3rd caterpillar.


This summer we are going to do a similar program where we will pass out cardboard star shapes for kids to decorate and hang for the summer reading program.

Thursday, April 5, 2012

Bunny Hop

With Easter right around the corner, we held a Bunny Hop this week for 3-6 year olds.  As the kids come in, they picked up their nametags.  These were bunny ear headbands with the first name's written across the band.


We started off the program by reading Little White Rabbit by Kevin Henkes.  We did the Bunny Hop (on Disney's More Dancin' Tunes cd) and the Bunny Pokey (on Holiday Pigggyback Songs cd).  We passed out die cut bunnies and did the following rhyme (I admit it, I "borrowed" this from another branch):

There's a Little Bunny
(to the tune of Happy and You Know It)
There's a little bunny sitting on my toe,
He is sitting on my toe, then off away he goes,
There is no little bunny on my toe.

There's a little bunny sitting on my knee,
He is sitting on my knee, just watch and he will flee,
There is no little bunny on my knee.

There's a little bunny sitting on my head,
He is sitting on my head, then away he goes to bed,
There is no little bunny on my head.


Next, we divided the kids in half so they could rotate through two craft stations.  At our first we made bunny paper bags.

Click here to download the bunny paper bag ears and mouth. (Note-the ears can also be used for the bunny headbands.)  To make bunny paper bags, first color the middle of the ears pink.  Cut out the ears and glue onto the top half of the white paper bag.  Cut out the mouth and glue near the bottom of the bag.  We used a 1 inch circle punch to make the pink noses.  The whiskers are cut out of black construction paper and are about 1/4 inch by 3 inches.  Glue the nose and whiskers to the bag above the mouth.  Draw eyes on the bag.  Add a cotton ball tail to the back of the bag with glue. 


To make the bunny paper cups, we started by shrinking down our bunny ears a lot.  Color the inside of the ears, cut them out, and glue to the back of the white paper cup.  We found peel and stick googly eyes at Michaels (my new favorite product!).  Stick the eyes about 1/3 the way down from the top of the cup.  The whiskers are cut into 1 inch pieces out of white pipe cleaners.  We put a 3-D glue dot where the nose should go and fit the 4 whiskers and mini pink pom pom on top of it.  To give it some color, we added pink or green Easter grass to the inside of the cup.

The Bunny Hop turned out really well and we would definitely do it again.

Wednesday, March 28, 2012

Flannel Friday-Twinkle Twinkle Little Star

I am a big fan of using props in story time!  If it can be done quickly for 30+ kids, it is even better.  These stars on a stick turned out really cute and with little effort.  The toddlers love having props to hold and the glitter adds a little extra pizazz.
To make these yourself, you will need craft sticks, fun foam and glitter glue.  After cutting out the star shapes, use Tacky glue to attach them to the craft sticks.  While you can use paper stars instead of foam ones, you can't laminate the paper or they will pop right off.  After the glue is dry, spread glitter glue around the edges of the stars to make them sparkle.

I use these in my story times when we sing Twinkle Twinkle Little Star.  If you don't like to sing, try the recording done by Lisa Loeb and Elizabeth Mitchell of Twinkle Twinkle on their Catch the Moon cd.  These work great for many different ages, from 2-year olds through my sensory story time kids (ages 3-10).

If you are looking for an additional use for these, we will be making them in our toddler craft event this summer (for ages 2-3).  The toddlers will use a glue dot to attach the star to a craft stick.  Then they will spread glue from a glue stick on the star and dip in loose glitter.

Tuesday, February 14, 2012

Toddler Crafts for Valentine's Day


Envelope heart pouches are cute and easy to do.  First, seal an envelope (I use legal-sized envelopes and buy a giant box of them at one time).  One corner of the envelope will form your bottom point of the heart.  Draw the top part of the heart and cut out.  You should be able to repeat with the other side of the envelope so you will get 2 pouches out of one envelope.  Use a hole punch and punch a hole in each side of the pouch near the top.  Have the kids put one end of the pipe cleaner through one hole and have a parent help them twist it together.  Repeat with the other side.  Then, decorate your pouch.  I like to use stickers, because they can be cut ahead of time, but crayons are fun too.


We had pre-cut red heart shapes for kids to make their own Valentines.  I like the heart stickers that we used because I like any form of literacy that we can add to a craft.  Many of the kids added their own crayon designs to the Valentines.


The final craft were white heart shapes that the kids filled in with tissue paper squares.  Here we used a combination of red and pink tissue paper to make our sample heart.
Related Posts Plugin for WordPress, Blogger...